Positioning of the sensor inside the knob
How to know when your non-IoT gas grill is running with Home Assistant
Have you ever wondered "did I shut off the gas on my grill" when you left home? Now you can find out, wherever you are!

We all love cooking with Home Assistant. However, grills with Internet of things functionality are few and far between — and the ones who do have said functionality, usually come with compromises (like the dreaded cloud dependency). "Dumb" grills are exactly as useful as their "smart" counterparts, but their gas knobs can be accidentally left open... usually to dangerous consequences.
Worry not, because Home Assistant can help you watch that knob! Here we learn a straightforward approach to smartify your gas grill — specifically, to finding out whether your grill is running with a cheap reed sensor: the humble ZigBee Aqara door sensor — which is normally used (you guessed it) to detect whether doors were left open.
Steps and ingredients
There are three very simple things you need to do:
- Pair the sensor with Home Assistant and set it up.
- Stick the sensor inside the knob.
- Stick a magnet in a strategic position.
For this, you'll need:
- Home Assistant, with ZigBee (ZHA) integration enabled.
- A Weber gas grill (although others may just work fine — see the photos below).
- A pair of small, stackable magnets (although other small magnets may work fine too).
- An Aqara door sensor (the included magnet will not be used here).
- Double-sided or wide Scotch tape.
Pair and configure the sensor
The first thing you'll do is pair the sensor using Home Assistant.
Go to where your gas grill normally is. This is important — ZigBee devices prefer to establish bonds with the devices "closest" to them.
Now (using your mobile device, presumably) go to the Settings screen, then click on Devices & Services. Click the blue button named Add integration, and then select Add ZigBee device.
Now long-press the reset button on your Aqara door sensor for five seconds — until the light in its front face blinks a few times.
You should see the normal pair success screen. Name the device whatever you want, and then (if you want) add it to one of your home areas.
This is how your newly-paired device should look like:

Now go to the sensor settings (click on it to pop up the more details screen, then open the Settings tab). Change its device class (Show as) to Gas. Here is a sample:

Now test the sensor. When you stick its magnet to it, you should see Clear in the sensor state. Conversely, when you pull the magnet away from it, you should see Detected in its state.
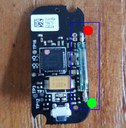
Stick the sensor inside the knob
This is what I need you to do:

What you'll do goes as follows.
- Close the knob fully, then pull the knob off the grill.
- Clean the knob's interior thoroughly — otherwise your setup will not be durable.
- Place a loop of Scotch tape (or an adequately-sized bit of double-sided tape) on the far long side of the sensor (the close long side has a "tooth", which you can see in the photo, and you'll want it facing towards you).
- Hold the knob as shown in the photo. The "top" of the knob — the notch that normally points up when the knob is fully closed — goes "up", and the bottom goes "down" (closer to you, so to speak).
- With your other hand, push the sensor in, with the tooth towards you and close to the center of the knob. You'll note the sensor can go in really only one way, because the center of the knob has a "triangle" of legs that won't let it fit any other way.
With the sensor securely in place, you should be good. The sensor's side closest to you should be roughly 5–7 mm out of level from the circular edge of the knob.
Stick the magnet in place
Reed sensors, as you know, work simply by detecting if there is a magnetic field in the vicinity. So the other component will be the magnet — or, rather, magnets. Here is what I used:

See above? That is a macro shot of the magnets in question. In my case, I stacked them as follows:

Why this size, you might ask? Because you want the magnets to neatly fit underneath the knob including the clearance left by the sensor, close enough to the sensor that it can be detected. Magnetic strength diminishes with the cube of the distance, so it's important to have strong but small magnets – keeping in mind that you also don't want them to be super strong.
With your magnets ready, place them roughly around this area in the grill.

The idea behind this placement is that the sensor shall hover over them partially when the knob is closed — enough that the sensor in the knob, closed, registers as Clear — but the moment that the knob is opened slightly, the sensor is now far away enough from the magnets that it registers as Detected.
Now disconnect your gas cylinder line. Then, place the knob back on the valve stem, and watch the sensor on your mobile device.
Does it say Clear? Then the magnets might be correctly placed and have the correct magnetic strength! If it doesn't say Clear, place then magnets closer to where the screw is in the photo, until the knob in the fully-closed position registers as Clear. If it still doesn't work, you may have to get a stronger or higher-profile magnet.
You are now ready for the next test. Turn the knob slightly open, until you see the sensor go to Detected. This should be a fairly narrow angle turn — you don't want the knob to be partially open with the sensor continuing to register as Clear. If this doesn't work, you may have to move the magnets away (towards the left, in a circular motion) from the direction of the screw in the photo. If it still doesn't work, substitute with shallower / weaker magnets instead.
OK. Final tests. Turn the knob wide open. The sensor must still register as Detected. In fact, all across the possible angles of aperture of your valve, it should say Detected. Then when the knob is turned to fully closed, the sensor should immediately flip to Clear. Do that a couple of times to guarantee no flukes or flakes.
Did these tests work work? Good. If they don't work, you'll have to tune the position of the magnets, or get weaker magnets instead. This is an iterative process!
Summarized:
- The magnets must make the sensor register as Clear when the valve is closed.
- From the moment the valve is slightly open, all the way to the valve fully open, the magnets must make the sensor register as Detected.
- Don't forget to recheck that the sensor operates per this spec, from time to time, and when you change the battery of the sensor.
Good to go? Close the knob fully, then reconnect your gas line.
Finishing touches
Congratulations! You've smartified your gas grill.
You're now ready to create dashboards — such as this reassuring display you'll no doubt double-check after you've left the home:

How about some automations? Here's the typical "left home + gas grill knob open = alert" one, in YAML format:
alias: "Loggia: alert when leaving the home with grill on"
description: ""
trigger:
  - platform: numeric_state
    entity_id: zone.home
    below: 1
condition:
  - condition: or
    conditions:
      - condition: state
        entity_id: binary_sensor.weber_grill_knob_1_opening
        state: "on"
      - condition: state
        entity_id: binary_sensor.weber_grill_knob_2_opening
        state: "on"
action:
  - service: notify.notify
    data:
      title: Gas grill on
      message: The gas grill was left on when you left the home.
mode: single
Enjoy your food!
Positioning of the sensor inside the knob
 Macro shot of the magnets.jpg
 Stacked magnets.jpg
 Magnet placement.jpg
 The mushroom card.png
Today you'll learn how to have Home Assistant assist you during steak cooking, oven use, pot roast preparation, and anything that requires you getting the temperature just right.

A cheap "are you in bed" sensor, built from a door and window sensor and a bunch of resistors? You bet!